iPhone・iPadでSSHクライアントアプリ
iPhoneが発売されて即手に入れ、早々にインストールしたSSHアプリ。
色々使ってみたけどCTRL等のキーがどうもイマイチだったので、ほとんど使うことがありませんでした。
しかーし!パニックさんがやってくれました!
A very nice SSH client for iOS. 「prompt」
これは使いやすい!オススメです。

MacOSXとLinux間でのネットワーク速度計測
過去にも同じような記事を書いたんですが、改めて。
今回もMacOSXとLinux間での速度測定。
今回はiperfを使います。
http://sourceforge.net/projects/iperf/files/
$ sudo port install iperf

Password:

Warning: port definitions are more than two weeks old, consider using selfupdate
-
-
- > Computing dependencies for iperf
- > Fetching iperf
- > Attempting to fetch iperf-2.0.4.tar.gz from http://jaist.dl.sourceforge.net/iperf
- > Verifying checksum(s) for iperf
- > Extracting iperf
- > Configuring iperf
- > Building iperf
- > Staging iperf into destroot
- > Installing iperf @2.0.4_0
- > Activating iperf @2.0.4_0
- > Cleaning iperf
-
これでOK。
次にLinux側です。
上から最新版をDLして
で完了。
tar zxvf iperf-xxxxx

cd iperf-xxxxx

./configure

make

make install
サーバー側になる方で
クライアント側で
$ iperf -s
$ sudo iperf -c サーバーIP
-
-
-
-
-
-
-
-
-
-
-
-
-
-
-
-
-
-
-
-
-
-
-
-
-
-
-
-
-
-
-
-
-
-
-
-
-
-
-
-
-
-
-
-
-
-
-
-
-
-
-
-
-
-
-
-
-
-
- -
-
-
-
-
-
-
-
-
-
-
-
-
-
-
-
-
-
-
-
-
-
-
-
-
-
-
-
-
-
-
-
-
-
-
-
-
-
-
-
-
-
-
-
-
-
-
-
-
-
-
-
-
-
-
-
-
-
Client connecting to サーバーIP, TCP port 5001
TCP window size: 65.0 KByte (default)
-
-
-
-
-
-
-
-
-
-
-
-
-
-
-
-
-
-
-
-
-
-
-
-
-
-
-
-
-
-
-
-
-
-
-
-
-
-
-
-
-
-
-
-
-
-
-
-
-
-
-
-
-
-
-
-
-
-
- -
-
-
-
-
-
-
-
-
-
-
-
-
-
-
-
-
-
-
-
-
-
-
-
-
-
-
-
-
-
-
-
-
-
-
-
-
-
-
-
-
-
-
-
-
-
-
-
-
-
-
-
-
-
-
-
-
-
[ 3] local クライアントIP port 55873 connected with サーバーIP port 5001
[ ID] Interval Transfer Bandwidth
[ 3] 0.0-10.0 sec 110 MBytes 92.7 Mbits/sec92.7 Mbits/secですね。
もちろんの事ですが、MacOSX同士でも計測できますので。
ついでにmanです。
IPERF(1) User Manuals IPERF(1)NAME
iperf - perform network throughput testsSYNOPSIS
iperf -s [ options ]iperf -c server [ options ]
iperf -u -s [ options ]
iperf -u -c server [ options ]
DESCRIPTION
iperf is a tool for performing network throughput measurements. It can test either TCP or UDP
throughput. To perform an iperf test the user must establish both a server (to discard traffic) and
a client (to generate traffic).GENERAL OPTIONS
-f, --format
[kmKM] format to report: Kbits, Mbits, KBytes, MBytes-h, --help
print a help synopsis-i, --interval n
pause n seconds between periodic bandwidth reports-l, --len n[KM]
set length read/write buffer to n (default 8 KB)-m, --print_mss
print TCP maximum segment size (MTU - TCP/IP header)-o, --output
output the report or error message to this specified file-p, --port n
set server port to listen on/connect to to n (default 5001)-u, --udp
use UDP rather than TCP-w, --window n[KM]
TCP window size (socket buffer size)-B, --bind
bind to, an interface or multicast address -C, --compatibility
for use with older versions does not sent extra msgs-M, --mss n
set TCP maximum segment size (MTU - 40 bytes)-N, --nodelay
set TCP no delay, disabling Nagle’s Algorithm-v, --version
print version information and quit-V, --IPv6Version
Set the domain to IPv6-x, --reportexclude
[CDMSV] exclude C(connection) D(data) M(multicast) S(settings) V(server) reports-y, --reportstyle C|c
if set to C or c report results as CSV (comma separated values)SERVER SPECIFIC OPTIONS
-s, --server
run in server mode-U, --single_udp
run in single threaded UDP mode-D, --daemon
run the server as a daemon
CLIENT SPECIFIC OPTIONS
-b, --bandwidth n[KM]
set target bandwidth to n bits/sec (default 1 Mbit/sec). This setting requires UDP (-u).-c, --client
run in client mode, connecting to-d, --dualtest
Do a bidirectional test simultaneously-n, --num n[KM]
number of bytes to transmit (instead of -t)-r, --tradeoff
Do a bidirectional test individually-t, --time n
time in seconds to transmit for (default 10 secs)-F, --fileinput
input the data to be transmitted from a file-I, --stdin
input the data to be transmitted from stdin-L, --listenport n
port to recieve bidirectional tests back on-P, --parallel n
number of parallel client threads to run-T, --ttl n
time-to-live, for multicast (default 1)-Z, --linux-congestion
set TCP congestion control algorithm (Linux only)ENVIRONMENT
TCP_WINDOW_SIZE
Controls the size of TCP buffers.DIAGNOSTICS
This section needs to be filled in.BUGS
Exit statuses are inconsistent. The threading implementation is rather heinous.AUTHORS
Iperf was originally written by Mark Gates and Alex Warshavsky. Man page and maintence by Jon Dugan
. Other contributions from Ajay Tirumala, Jim Ferguson, Feng Qin, Kevin
Gibbs, John Estabrook, Andrew Gallatin , Stephen
HemmingerSEE ALSO
http://iperf.sourceforge.net/
OpenSIPSをCentOS5.5にインストールする方法
超久々の更新はOpenSIPSをCentOS5.5にインストールする方法です。
まだあれこれテスト中なので、とりあえず備忘録です。間違ってたら教えてください。
CentOS5.5を準備したらコンパイルに必要な物をいれておきます。
とりあえず"Development tools"を入れておけば問題ないでしょう。他にもパッケージが必要っぽいので入れておきます。
yum -y groupinstall "Development tools"

yum -y install zlib-devel openssl-devel mysql mysql-devel gcc bison flex subversion
OpenSIPSからソースを取得します。
色々な方法が可能ですが、今回は最新版をSVNでチェックアウトします。
今日現在では1.6.4が最新ぽいので1.6を取得。
cd /usr/src/

svn co https://opensips.svn.sourceforge.net/svnroot/opensips/branches/1.6 opensips
あとはコンパイルですが、mysqlを利用する場合はMakefileの52行目あたりを修正します。
でインストールが完了します。
cd opensips

vi Makefile52行目付近の「db_mysql」を削除します。

修正前

# if not set on the cmd. line or the env, exclude this modules:

exclude_modules?= b2b_logic jabber cpl-c xmpp rls mi_xmlrpc xcap_client \

        db_mysql db_postgres db_unixodbc db_oracle db_berkeley aaa_radius \

        osp perl snmpstats perlvdb carrierroute mmgeoip \

        presence presence_xml presence_mwi presence_dialoginfo \

        pua pua_bla pua_mi pua_usrloc pua_xmpp pua_dialoginfo \

        ldap h350 identity regex memcached db_http json dialplan修正後

# if not set on the cmd. line or the env, exclude this modules:

exclude_modules?= b2b_logic jabber cpl-c xmpp rls mi_xmlrpc xcap_client \

        db_postgres db_unixodbc db_oracle db_berkeley aaa_radius \

        osp perl snmpstats perlvdb carrierroute mmgeoip \

        presence presence_xml presence_mwi presence_dialoginfo \

        pua pua_bla pua_mi pua_usrloc pua_xmpp pua_dialoginfo \

        ldap h350 identity regex memcached db_http json dialplan上を保存したら

make clean

make

make install
インストールが完了したら、起動テストを行います。
[root@OpenSIPS 1.6]# opensipsctl startINFO: Starting OpenSIPS :

INFO: started (pid: 17413)起動したらプロセスをチェックするとこんな感じです。

[root@OpenSIPS 1.6]# ps aux | grep opensips

root     17413  0.0  0.5  38240  2872 ?        S    23:19   0:00 /usr/local/sbin/opensips -P /var/run/opensips.pid

root     17415  0.0  0.1  38244   676 ?        S    23:19   0:00 /usr/local/sbin/opensips -P /var/run/opensips.pid

root     17416  0.0  0.1  38240   584 ?        S    23:19   0:00 /usr/local/sbin/opensips -P /var/run/opensips.pid

root     17417  0.0  0.1  38240   580 ?        S    23:19   0:00 /usr/local/sbin/opensips -P /var/run/opensips.pid

root     17418  0.0  0.1  38240   580 ?        S    23:19   0:00 /usr/local/sbin/opensips -P /var/run/opensips.pid

root     17419  0.0  0.1  38240   580 ?        S    23:19   0:00 /usr/local/sbin/opensips -P /var/run/opensips.pid

root     17420  0.0  0.1  38240   584 ?        S    23:19   0:00 /usr/local/sbin/opensips -P /var/run/opensips.pid

root     17421  0.0  0.1  38240   584 ?        S    23:19   0:00 /usr/local/sbin/opensips -P /var/run/opensips.pid

root     17422  0.0  0.1  38240   584 ?        S    23:19   0:00 /usr/local/sbin/opensips -P /var/run/opensips.pid

root     17423  0.0  0.1  38240   584 ?        S    23:19   0:00 /usr/local/sbin/opensips -P /var/run/opensips.pid

root     17424  0.0  0.0  38240   464 ?        S    23:19   0:00 /usr/local/sbin/opensips -P /var/run/opensips.pid

root     17425  0.0  0.1  38240   592 ?        S    23:19   0:00 /usr/local/sbin/opensips -P /var/run/opensips.pid

root     17426  0.0  0.1  38240   668 ?        S    23:19   0:00 /usr/local/sbin/opensips -P /var/run/opensips.pid

root     17427  0.0  0.1  38240   668 ?        S    23:19   0:00 /usr/local/sbin/opensips -P /var/run/opensips.pid

root     17428  0.0  0.1  38240   668 ?        S    23:19   0:00 /usr/local/sbin/opensips -P /var/run/opensips.pid

root     17429  0.0  0.1  38240   668 ?        S    23:19   0:00 /usr/local/sbin/opensips -P /var/run/opensips.pid

root     17430  0.0  0.1  38240   656 ?        S    23:19   0:00 /usr/local/sbin/opensips -P /var/run/opensips.pid

root     17435  0.0  0.1   5080   760 pts/0    R+   23:20   0:00 grep opensips
次に、インストールするだけでは起動スクリプトが入っていないのでコピーして持ってきます。
cp /usr/src/opensips/packaging/fedora/opensips.init /etc/init.d/opensips

chmod +x /etc/init.d/opensips
この起動スクリプトもこのままでは動きませんので修正します。
修正は4箇所です。
#!/bin/bash
#
# Startup script for OpenSIPS
#
# chkconfig: - 85 15 <=ココを下行に書き換え
# chkconfig: 345 96 15
# description: OpenSIPS is a fast SIP Server.
#
# processname: opensips
# pidfile: /var/run/opensips.pid
# config: /etc/opensips/opensips.cfg
#
### BEGIN INIT INFO
# Provides: opensips
# Required-Start: $local_fs $network $named
# Should-Start: mysqld postgresql
# Short-Description: start, stop OpenSIPS
# Description: OpenSIPS is a very fast and flexible SIP (RFC3261) server.
## END INIT INFO# Source function library.
. /etc/rc.d/init.d/functions#oser=/usr/sbin/opensips <=ココを下行に書き換え
oser=/usr/local/sbin/opensipsctl
PATH=/sbin:/bin:/usr/local/sbin:/usr/local/bin <=追記
prog=opensips
RETVAL=0[ -f /etc/sysconfig/$prog ] && . /etc/sysconfig/$prog
start() {
echo -n $"Starting $prog: "
# there is something at end of this output which is needed to
# report proper [ OK ] status in Fedora scripts
#daemon $oser $OPTIONS 2>/dev/null | tail -1 <=ココを下行に書き換え
daemon $oser $OPTIONS >/dev/null 2>/dev/null
RETVAL=$?
echo
[ $RETVAL = 0 ] && touch /var/lock/subsys/$prog
あとはchkconfigで起動出来るように追加
[root@OpenSIPS 1.6]# chkconfig --add opensips

[root@OpenSIPS 1.6]# chkconfig opensips on

[root@OpenSIPS 1.6]# chkconfig --list opensips

opensips       	0:off	1:off	2:on	3:on	4:on	5:on	6:off
これで完了です。
起動はstartです。stop|reload|restart|condrestart|status|helpも利用できます
opensipsctl start

か

service opensips start
Eclipse Helios (3.6.1)日本語をSnowleopardにインストールする方法。
Eclipseを入れる事があったけど、手持ちの情報が古かったので備忘メモ。
まずはEclipse本体をダウンロードして解凍。
本体のダウンロードはここから http://www.eclipse.org/downloads/
当然ですが、MACの方はMAC版をDLしてくださいね。
適当な場所にダウンロードしたファイルを解凍して出来上がったフォルダ一式を移動します。
ま、普通は/Applications/eclipse/ って感じですかね。
次に、日本語化を行います。
Pleiades (プレアデス) って言う日本語化プラグインを入れます。
Eclipse日本語化プラグインはここから Eclipse 日本語化 - MergeDoc Project
.zipファイルなので、こちらも適当な場所で解凍してください。
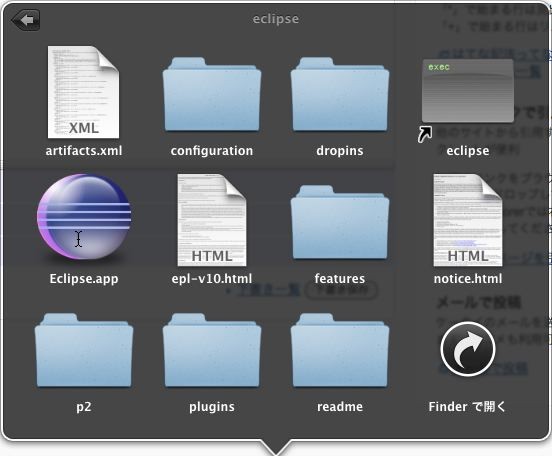
次に、Eclipseのディレクトリ(今回は/Applications/eclipse/)にzipを展開して開いたフォルダのfeaturesフォルダの中身とpluginsフォルダの中身を/Applications/eclipse/featuresとpluginsの中にコピー。
ここで注意することはFinderでfeaturesもしくはpluginsフォルダをそのままeclipseフォルダにドラッグ&ドロップしないでください。元からあるファイルが消えてしまいます。
んで仕上げにターミナルから下を実行。改行して見えるかも知れませんが、1行です。
こんな感じにペーストしてEnterでOKです。
echo "-javaagent:/Applications/eclipse/plugins/jp.sourceforge.mergedoc.pleiades/pleiades.jar" >> /Applications/eclipse/Eclipse.app/Contents/MacOS/eclipse.ini/Applications/eclipse/以外に『Eclipseのディレクトリ』を置いた場合は下記参考。

echo "-javaagent:『Eclipseのディレクトリ』/plugins/jp.sourceforge.mergedoc.pleiades/pleiades.jar" >> 『Eclipseのディレクトリ』/Eclipse.app/Contents/MacOS/eclipse.ini

iPhoneでAsterisk/trixboxのステータス管理
ブログやめようかなぁと思ってたけど、ブログ見て参考にしましたって言ってくださる方もチョイチョイ出会う様になってきたので、久々に更新。
今日はiPhoneからAsterisk/trixboxのステータスを確認するアプリのご紹介です。
通常、Asteriskやtrixboxのステータスを確認するには、WEBブラウザ経由だったりAsteriskCLI経由で色々確認する方法が一般的ですね。
他の方法はAMI(AsteriskManagerInterface)経由でも確認する事ができます。
今日のアプリは、このAMI経由でAsteriskやtrixboxのステータスを確認しちゃおうというものです。
PocketOperator 600円
[WEB]
http://pocketoperator.com/
[iTunesStore]
http://itunes.apple.com/jp/app/pocket-operator/id377083124?mt=8
- View Calls and Channel Details
- Transfer Calls w/Presets (very cool)
- Swipe to Hangup
- Record Calls
- Manage Meetings (Mute and Kick Callers)
- Reload Configurations
- Convenient and Immediate Restarts
やり方は超簡単で、/etc/asterisk/manager.confにユーザー名とパスワードと権限を追加して、アプリから接続するだけです。
PocketOperatorのサイトにもありますが、/etc/asterisk/manager.confに下の様な感じで追加してください。
[general]

enabled=yes

port=5038[foo]   ←ユーザー名になります。

secret=bar   ←パスワードになります。

read=system,call,command

write=system,call,command
んでもってAsteriskをreloadすればOK.
アプリに上の情報をそのまんま設定すれば繋がります。
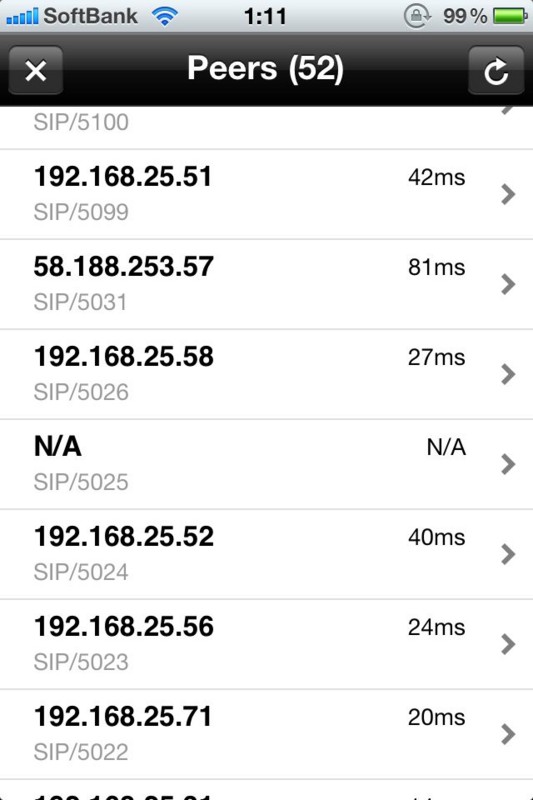
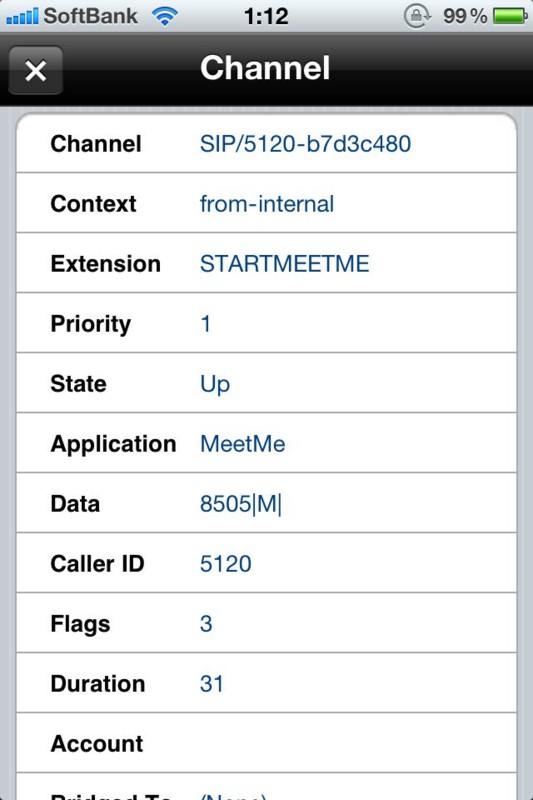
出来ることはChannels/Peers/Meetings/Utilities項があって、それぞれ確認やリロード、再起動などが出来ます。
たとえば、通話中のチャンネルを表示したり

レジストが上がってきている内線を一覧したり

Asteriskをリロードしたり、再起動したり

通話チャンネルの詳細を表示したり

ウチらには、結構便利?かも。でも、どんな場面で使うのかは。。。。う〜ん。
1点注意を。インターネットにAsterisk/trixboxサーバーを設置する事例が増えてきていますが、これは超危険です。
5060ポートがあいてると分かると、SIPのID/PWに対して知らないところからガンガン接続を試みてきます。
trixboxProとかCEとかは非常に普及してきてて、デフォルトのユーザー名とパスワードを知っている人も多くなってきているので、そのデフォルト設定のままで、インターネットにさらすとエライ事になります。
もちろんAMIも同じ。便利だからと言ってAMIにどこからでも接続出来るようにしてしまって、しかもID/PWをデフォルトですれば、速攻でヤラレます。
特にpermitの設定は絶対気をつけてくださいね。私の知り合いも、マッハでヤラレました。。。
皆さん、セキュリティはしっかりしないと不正発信されたりして、エライ目合いますよ〜。
あと、本件には関係無いかもしれませんが、iptablesとかを設定せずにインターネット上に設置している人が思ったより多いみたいなので、こちらもしっかり設定してくださいね。
CentOS5.4のカーネルを2.6.33.2最新にする(とりあえずVMware Fusion上で)
最近忙しくって、久々の更新。
ず〜っと昔、興味だけでLinuxカーネルの再構築をしたことがあったけど、当時特に目的も無かったからか、脳みそに全く残っていなかったので再度挑戦。
挑戦って言うか、最新のカーネルじゃないと駄目っぽい案件があるので、検証がてらやってみました。
今日は、iMAC + OS X 10.6.3 SnowLeopard にVMware FusionにCentOS5.4をインストールした環境で取りあえずテストしてみました。超はまったので、忘れないうちにメモ。
CentOS5.4をインストールして、yum で最新版にアップしておきます。
この時点でのカーネルは2.6.18-164.15.1.el5 でした。
まず最新版のカーネルをここ(ftp://ftp.jp.kernel.org/pub/linux/kernel/v2.6/)から取って展開しときます。
cd /usr/src/kernels/

wget wget ftp://ftp.jp.kernel.org/pub/linux/kernel/v2.6/linux-2.6.33.2.tar.gz

tar zxvf linux-2.6.33.2.tar.gz

cd linux-2.6.33.2
インストール時の.configをコピー
cp /usr/src/kernels/2.6.18-164.15.1.el5-i686/.config /usr/src/kernels/linux-2.6.33.2/
インストール時のconfigを最新カーネルに引継ぎ
凄い数の項目でドライバー等をどうするか聞かれますが、わかる人は環境にあわせて決めてください。
make oldconfig
今回は、すべてEnterで切り抜けます。
カーネルオプションの選択
ここで、エラはまりしたので注意。
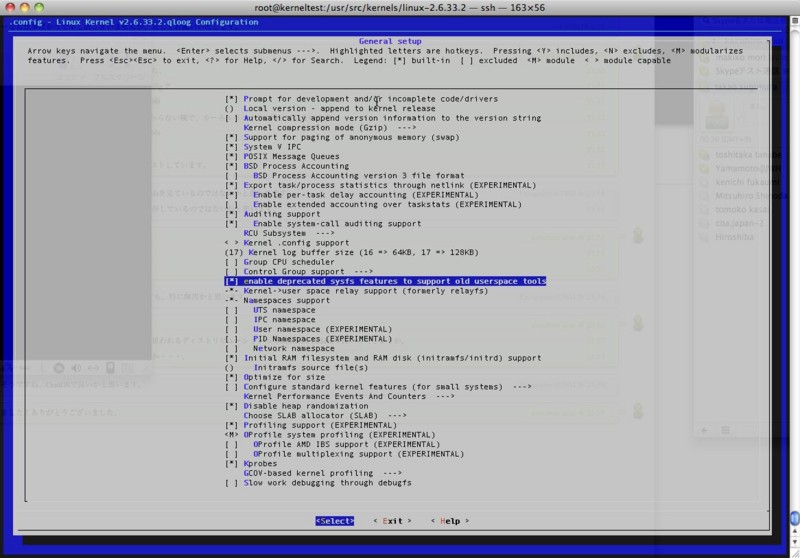
[General Setup] → [deprecated sysfs features to support old userspace tools] をenableにしないといけなかったようで、このまま何もせずに最後まで行って再起動するとカーネルパニックに陥り起動できなくなります。
make menuconfig

[select]をenterで選択して

を[*]にします。
んで、設定が終わったらついでにカーネルに名前をつけときます。
Kernelに名前をつけるには、「EXTRAVERSION」を変更します。
上の場合は、「2.6.33.2.qloogtest」って名前のカーネルになります。
# vi Makefile

EXTRAVERSION = .2.qloogtest
実運用ならもっとわかりやすくつける必要がありますが、今日はテストなので。
ほんでもって、あとは再構築作業です。
これが、また時間がかかる。
make clean && make -j2 bzImage && make -j2 modules && make modules_install && make install
- j2で2コアを使うという意味らしく、クアッドコアの人は-j4だそうで。
再構築が終わったら、GRUBの設定を変更して新カーネルがデフォルトでブートされるように変更
保存して再起動
# vi /etc/grub.conf

#boot=/dev/sda

default=0  ←ここを0に。

timeout=5

splashimage=(hd0,0)/grub/splash.xpm.gz

hiddenmenu

title CentOS (2.6.33.2.qloogtest)

        root (hd0,0)

        kernel /vmlinuz-2.6.33.2.qloogtest ro root=/dev/VolGroup00/LogVol00
rebootこれで2.6.33.2.qloogカーネルで起動してます。再起動したら
# uname -r
2.6.33.2.qloog
時間は掛かるけど、はまらなければそれほど難しくない。
VMwareを使うと、スナップショットが取れるのでこんな感じの検証作業は楽ですなぁ。
解決するまでにロールバックを何度したことか・・・。
見たところエラーも無いようなので、実サーバーでやってみるか。
Snowleopardでwgetコマンドをインストールして使用する方法
仕事でtrixboxProを触っていると、Linuxコマンドのwgetを良く使うけど、実はMACにwgetコマンドはありません。
ついつい、クセでifconfigとipconfigを打ち間違えるように、wgetをMACで使ってしまいエラーがでて???って状態で混乱するときがしばしば。
端っからcurlを使えば良いのですが、ターミナルがデスクトップにウジャウジャしているときに、頭を使うのが面倒なのでwgetをインストール。
ftp://ftp.gnu.org/pub/gnu/wget/ から最新版をダウンロードしてきます。
どう見てもバージョンと更新日がおかしいような気がするので、一応バージョンの一番新しいのをダウンロード。
curl -O ftp://ftp.gnu.org/pub/gnu/wget/wget-1.9.tar.gz
んでもって、保存したwget-*.tar.gzを解凍してインストール。
管理者権限が無いとコンパイル時にエラーがでるので、sudoを利用します。
ほんでもって、wget は /usr/lobal/bin に入るので、/usr/bin/ にシンボリックリンクを作って完了。
うん、便利。
tar zxvf wget-1.9.tar.gz

cd wget-1.9

./configure

make

sudo make install

ln -s /usr/local/bin/wget /usr/bin/wget
